
Turning your WordPress site into a community with BuddyPress has never been easier thanks to improvements in recent versions of the social networking plugin.
BuddyPress works great with a huge number of free and premium themes, and the BuddyPress components look great in responsive themes too.
If you’d like to turn your site into a community of users and add social media features, then the free BuddyPress plugin makes it possible. In this post, I’ll show you how to install and configure BuddyPress on your site. You’ll learn how to create pages for BuddyPress, to add these to your menu and widgets, and to test your site using test data.
If you want to learn all about BuddyPress before you start, then the dedicated BuddyPress site is a great place to go, and we also have plenty of BuddyPress guides here on WPMU DEV.
But for me the best way to learn anything is by having a bash at it, so let’s get started!
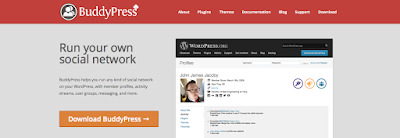
BuddyPress helps you run any kind of social network on your WordPress site.
Installing BuddyPress
The first thing you’ll need to do is install the BuddyPress plugin. I’m going to install it on a fresh WordPress installation, but you can also install it on an existing site.
In your WordPress admin screens, go to Plugins > Add New, and you’ll see BuddyPress displayed prominently in the list of available plugins. Click the Install button followed by the Activate plugin link, and BuddyPress will be installed for you.
You’ll be immediately taken to the BuddyPress welcome screen:
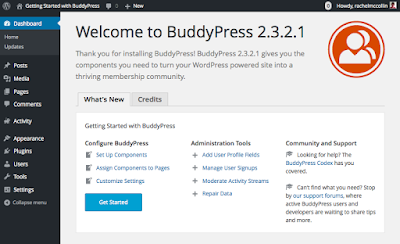
Here you’ll find various links to help you set up and manage your BuddyPress community. Start by configuring settings for BuddyPress.
Configuring BuddyPress
There are three aspects to configuring BuddyPress:
Selecting the components you want to include.
Creating pages.
Customizing settings.
The place to start is by selecting components, as that will have a knock-on effect on the other settings.
Activating BuddyPress Components
To choose the components you’ll be using, either click the Set Up Components link in the welcome screen or go to Settings > BuddyPress and select the Components tab.
By default, some but not all of the components are selected for you:
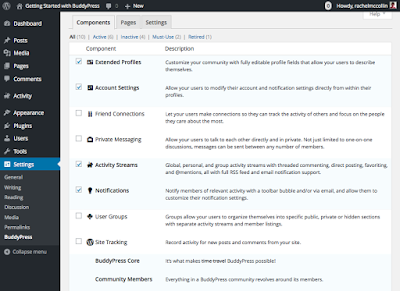
Depending on how you want your community to operate, you can select from as many as you want from the following:
Extended Profiles: customize user profiles and configure the available fields.
Account Settings: let your users edit their account settings.
Friend Connections: let users make connections with each other.
Private Messaging: Let users send each other private messages.
Activity Streams: display streams of activity on the site with direct posting to the front-end, threaded commenting, mentions and email notification.
Notifications: select this and your members will receive notifications of recent activity in the way that they select.
User Groups: allow the creation of user groups for people to create their own networks in your community.
Site Tracking: track what’s happening on your site (posts and comments).
BuddyPress Core: you can’t deselect this component as without it, BuddyPress won’t work!
Community Members: again you can’t deselect this as BuddyPress won’t function without members.
You can select as many or as few of these as are relevant for your site, and add to them at a later date if you decide to extend your community’s scope.
I’m going to select all of the components (maybe because I’m greedy, or more likely because I want to demonstrate them all here). Check all the boxes you need for your site and click the Save Settings button.
Configuring Pages
The next step is to configure the pages that BuddyPress will use. Before moving on to the Pages tab, however, you’ll need to create a couple of pages: for registration and activation.
Note: If your community is closed and people can’t register themselves (i.e. you’ll be adding all of the users manually), you can skip this step.
In your WordPress admin, go to Pages > Add New, and create the two pages as you normally would. Call one Registration and the Other Activation (or something different but meaningful to you and your users).
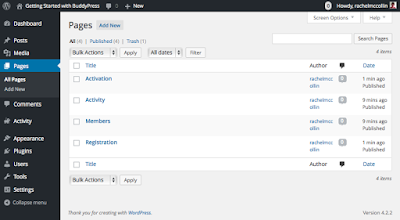
Once you’ve done that, you’ll see all of the pages in your site so far in the main Pages listing screen. BuddyPress has already added two more pages for you: Activity and Members. I’ve deleted the default ‘Sample Page’ that WordPress creates so I now have four pages in total.
Now you have your pages in place, you can configure them for BuddyPress.
Go back to Settings > BuddyPress and click the Pages tab.
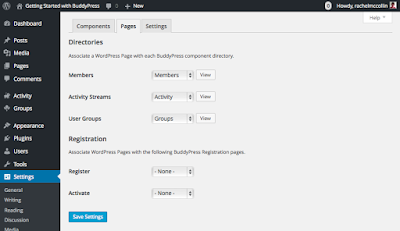
Select pages for each function as follows:
Members: select Members.
Activity Streams: select Activity.
User Groups: select Groups.
Register: select Registration.
Activate: select Activation.
Click the Save Settings button. BuddyPress will automatically use those pages to display the appropriate content in your site.
Configuring Settings
Now that you’ve selected components and created pages, it’s time to move on to configure BuddyPress settings.
Click the Settings tab.
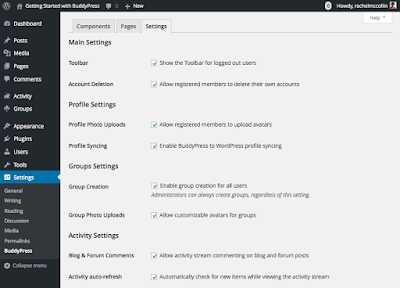
This screen gives you a number of options for features you can choose to enable or disable. These are:
Main Settings: enable or disable the toolbar at the top of the screen for logged-in users, and specify whether users can delete their account themselves.
Profile Settings: allow members to upload their own profile picture, and sync BuddyPress and WordPress profiles.
Groups Settings: let users create groups, and choose whether to allow customization of group avatars.
Activity Settings: enable activity stream commenting on blog and forum posts as well as BuddyPress updates, and auto-referees the activity stream in real time.
Select the ones that are relevant to your site and click the Save Settings button. I’m selecting everything (being greedy again!).
Configuring WordPress Settings
Now that you’ve got BuddyPress set up, it’s a good idea to configure your WordPress settings before moving on to adding your navigation menu and widgets.
In the Settings menu in the WordPress admin, edit these settings:
Permalinks: make sure pretty permalinks are turned on.
Reading: set this so that the home page is a static page, namely the Activity page. This will ensure that when your users open your site, they see recent activity. I’m leaving the Posts page option blank as my site doesn’t have a blog: if yours does, select the appropriate page.
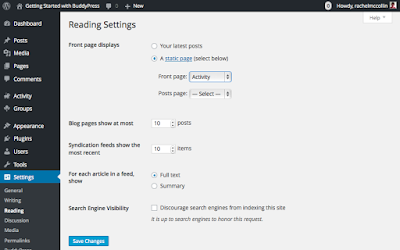
Note: If you’re adding BuddyPress to an established site and want to keep your existing home page, you might choose not to have the activity page as your home page. But make sure your Activity page is nice and easy for people to find.
Change the settings on those two screens and click Save Changes for each.
Installing a Theme
Now you need a theme for your site. If you’re working with an existing site you can skip this bit as the chances are you’re happy with your existing theme.
A few years ago, you could only use a BuddyPress-compatible theme if you wanted to run BuddyPress, and if you wanted to use the plugin with your own theme, you’d have to add some extra theme template files to make BuddyPress work. If you’ve been told that you still have to do this, don’t worry: you don’t. Since version 1.7, BuddyPress will work with any well-written theme, although there will always be some themes whose layout and design suit BuddyPress better than others.
I’m going to use a theme called Spacious, which is free with a clean design that doesn’t detract from the myriad of content your users will generate and has customization options that mean you can tweak the design.
Go to Appearance > Themes and click the Add New button. Type spacious into the search box to see the theme displayed:
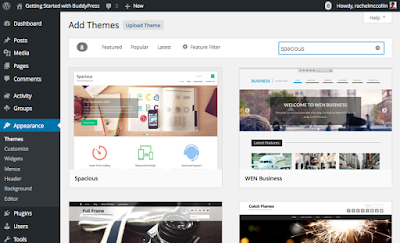
Click the Install button followed by the Activate link to install and activate the theme. If you’d like to customize the theme, you can do so via the theme settings screen or the customizer.
Adding a Menu and Widgets for Navigation
Next let’s add a menu and some widgets to the site to improve navigation.
Creating a Navigation Menu
If your site doesn’t already have a navigation menu you’ll need to create one and assign it to the primary slot in your theme.
Go to Appearance > Menus and click the create a new menu link. Name your menu, check the Primary Navigation checkbox and save it.
If you can’t see a section called BuddyPress on the left hand side, with all of the BuddyPress pages listed, you can turn it on by opening the Screen Options tab at the top of the screen and checking BuddyPress.
Now add a selection of the BuddyPress pages and your normal pages to the navigation menu. I’m adding these pages:
Activity (with Messages and Notifications as second level links beneath this)
Friends
Groups
Profile (with Settings at the second level)
Log Out
Log In
Registration.
All of these apart from the last one are taken from the BuddyPress list on the left: the Registration link is taken from the Pages list. I’ve changed the link text for Registration to Join, to make it more direct.
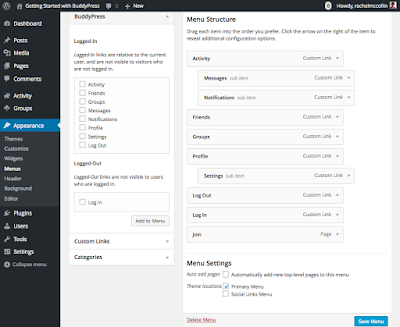
Now click Save Menu to save it.
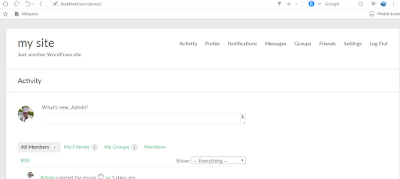
Here’s how the site looks with the new theme and menu:
Next I want to add some widgets to display activity and help users navigate around the site.
Adding Widgets
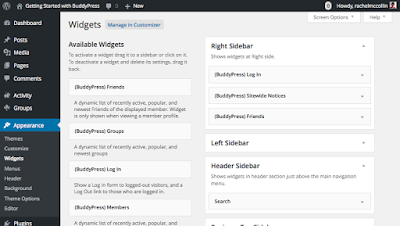
I’m going to add widgets to my sidebar and header widget areas, plus the four footer widget areas. If you’re using a different theme you’ll probably have different widget areas. Also the widgets you have available to use will depend on the components you activated at the beginning.
Add these widgets to the sidebar widget area:
BuddyPress Log In
BuddyPress Sitewide Notices
BuddyPress Friends
Add the Search widget to the header widget area, if your theme has one. If not, it’s a good idea to add it to the sidebar.
Here are the widget areas I’m adding:
Next, I’ll add three BuddyPress-specific widgets to the first three footer widget areas:
BuddyPress Who’s Online
BuddyPress Recently Active Members
BuddyPress Groups
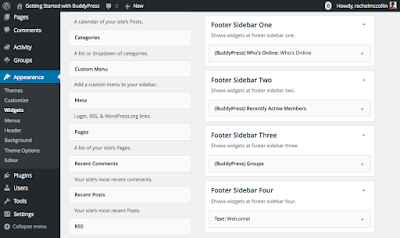
Finally, add a text widget to the fourth footer widget area, with some explanatory text about the community and a link to the registration page.

Managing Your BuddyPress Site
Now that your site is up and running, the next step is to promote it and encourage people to join. What you’ll need to do will depend on the nature of your community: if your site is for a small, already established group or team that shouldn’t be too hard; if it serves an existing community you’ll have to spread the word and encourage others too; and if you’re looking for a wider audience and/or selling membership, you’ll need a robust marketing plan.
Once people start joining there are tasks you’ll have to keep on top of as the site administrator:
Keeping your site up to date, including WordPress, the BuddyPress plugin, your theme and any other plugins you have installed.
Testing the site when updating to ensure no problems arise (it’s good idea to test updates on a development or staging version of your site first to be safe).
Keeping regular backups with a plugin like Snapshot Pro.
If necessary, moderating the community and resolving any complaints or disputes.
As your community grows, moderation is likely to become more important. It’s a good idea to define some community standards or guidelines right at the start and create a page for these on your site, so people know what’s expected. These will include guidelines about spam, trolling, use of profanity, personal attacks, spammy links, uploads and more. What you include will depend on you and your community, and may evolve over time.
As the administrator you can delete a user’s account if they breach the community guidelines, but it’s best to delete specific posts or interactions first if they’re inappropriate and/or contact the user about it. You’ll have to find a balance between preventing unacceptable behaviour and being heavy-handed – if you’ve been following the rise of Facebook and twitter, you;’ll know how hard this can be!
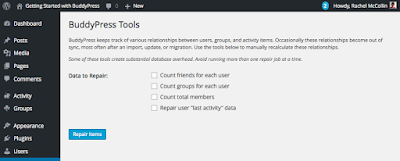
If you find that the metadata relating to your community is incorrect following an update or restore, you can use the BuddyPress Tools screen to fix specific data:
Count friends for each user
Count groups for each user
Count total members
Repair user “last activity” data.
Summary
BuddyPress is a powerful tool for creating online communities, which you can use for anything from a small team to a massive network of people across the world. It has the flexibility to accommodate a variety of uses, because you can switch components and settings on and off according to the needs of your site.
In this post you’ve learned how to install and configure BuddyPress, add BuddyPress pages to your navigation menu, insert BuddyPress widgets into your theme’s widget areas, and use dummy data to test your community.
Now that your site is up and running, all that remains is for you to encourage people to join, and to start a conversation with them. Enjoy!
What do you use BuddyPress for? How does it enhance your community? Add your experiences in the comments below.
you can also view the video below:-
BuddyPress works great with a huge number of free and premium themes, and the BuddyPress components look great in responsive themes too.
If you’d like to turn your site into a community of users and add social media features, then the free BuddyPress plugin makes it possible. In this post, I’ll show you how to install and configure BuddyPress on your site. You’ll learn how to create pages for BuddyPress, to add these to your menu and widgets, and to test your site using test data.
If you want to learn all about BuddyPress before you start, then the dedicated BuddyPress site is a great place to go, and we also have plenty of BuddyPress guides here on WPMU DEV.
But for me the best way to learn anything is by having a bash at it, so let’s get started!

BuddyPress helps you run any kind of social network on your WordPress site.
The first thing you’ll need to do is install the BuddyPress plugin. I’m going to install it on a fresh WordPress installation, but you can also install it on an existing site.
In your WordPress admin screens, go to Plugins > Add New, and you’ll see BuddyPress displayed prominently in the list of available plugins. Click the Install button followed by the Activate plugin link, and BuddyPress will be installed for you.
You’ll be immediately taken to the BuddyPress welcome screen:

Here you’ll find various links to help you set up and manage your BuddyPress community. Start by configuring settings for BuddyPress.
There are three aspects to configuring BuddyPress:
Selecting the components you want to include.
Creating pages.
Customizing settings.
The place to start is by selecting components, as that will have a knock-on effect on the other settings.
To choose the components you’ll be using, either click the Set Up Components link in the welcome screen or go to Settings > BuddyPress and select the Components tab.
By default, some but not all of the components are selected for you:

Depending on how you want your community to operate, you can select from as many as you want from the following:
Extended Profiles: customize user profiles and configure the available fields.
Account Settings: let your users edit their account settings.
Friend Connections: let users make connections with each other.
Private Messaging: Let users send each other private messages.
Activity Streams: display streams of activity on the site with direct posting to the front-end, threaded commenting, mentions and email notification.
Notifications: select this and your members will receive notifications of recent activity in the way that they select.
User Groups: allow the creation of user groups for people to create their own networks in your community.
Site Tracking: track what’s happening on your site (posts and comments).
BuddyPress Core: you can’t deselect this component as without it, BuddyPress won’t work!
Community Members: again you can’t deselect this as BuddyPress won’t function without members.
You can select as many or as few of these as are relevant for your site, and add to them at a later date if you decide to extend your community’s scope.
I’m going to select all of the components (maybe because I’m greedy, or more likely because I want to demonstrate them all here). Check all the boxes you need for your site and click the Save Settings button.
Configuring Pages
The next step is to configure the pages that BuddyPress will use. Before moving on to the Pages tab, however, you’ll need to create a couple of pages: for registration and activation.
Note: If your community is closed and people can’t register themselves (i.e. you’ll be adding all of the users manually), you can skip this step.
In your WordPress admin, go to Pages > Add New, and create the two pages as you normally would. Call one Registration and the Other Activation (or something different but meaningful to you and your users).
Once you’ve done that, you’ll see all of the pages in your site so far in the main Pages listing screen. BuddyPress has already added two more pages for you: Activity and Members. I’ve deleted the default ‘Sample Page’ that WordPress creates so I now have four pages in total.

Now you have your pages in place, you can configure them for BuddyPress.
Go back to Settings > BuddyPress and click the Pages tab.

Select pages for each function as follows:
Members: select Members.
Activity Streams: select Activity.
User Groups: select Groups.
Register: select Registration.
Activate: select Activation.
Click the Save Settings button. BuddyPress will automatically use those pages to display the appropriate content in your site.
Configuring Settings
Now that you’ve selected components and created pages, it’s time to move on to configure BuddyPress settings.
Click the Settings tab.

This screen gives you a number of options for features you can choose to enable or disable. These are:
Main Settings: enable or disable the toolbar at the top of the screen for logged-in users, and specify whether users can delete their account themselves.
Profile Settings: allow members to upload their own profile picture, and sync BuddyPress and WordPress profiles.
Groups Settings: let users create groups, and choose whether to allow customization of group avatars.
Activity Settings: enable activity stream commenting on blog and forum posts as well as BuddyPress updates, and auto-referees the activity stream in real time.
Select the ones that are relevant to your site and click the Save Settings button. I’m selecting everything (being greedy again!).
Configuring WordPress Settings
Now that you’ve got BuddyPress set up, it’s a good idea to configure your WordPress settings before moving on to adding your navigation menu and widgets.
In the Settings menu in the WordPress admin, edit these settings:
Permalinks: make sure pretty permalinks are turned on.
Reading: set this so that the home page is a static page, namely the Activity page. This will ensure that when your users open your site, they see recent activity. I’m leaving the Posts page option blank as my site doesn’t have a blog: if yours does, select the appropriate page.

Note: If you’re adding BuddyPress to an established site and want to keep your existing home page, you might choose not to have the activity page as your home page. But make sure your Activity page is nice and easy for people to find.
Change the settings on those two screens and click Save Changes for each.
Installing a Theme
Now you need a theme for your site. If you’re working with an existing site you can skip this bit as the chances are you’re happy with your existing theme.
A few years ago, you could only use a BuddyPress-compatible theme if you wanted to run BuddyPress, and if you wanted to use the plugin with your own theme, you’d have to add some extra theme template files to make BuddyPress work. If you’ve been told that you still have to do this, don’t worry: you don’t. Since version 1.7, BuddyPress will work with any well-written theme, although there will always be some themes whose layout and design suit BuddyPress better than others.
I’m going to use a theme called Spacious, which is free with a clean design that doesn’t detract from the myriad of content your users will generate and has customization options that mean you can tweak the design.
Go to Appearance > Themes and click the Add New button. Type spacious into the search box to see the theme displayed:

Click the Install button followed by the Activate link to install and activate the theme. If you’d like to customize the theme, you can do so via the theme settings screen or the customizer.
Adding a Menu and Widgets for Navigation
Next let’s add a menu and some widgets to the site to improve navigation.
Creating a Navigation Menu
If your site doesn’t already have a navigation menu you’ll need to create one and assign it to the primary slot in your theme.
Go to Appearance > Menus and click the create a new menu link. Name your menu, check the Primary Navigation checkbox and save it.
If you can’t see a section called BuddyPress on the left hand side, with all of the BuddyPress pages listed, you can turn it on by opening the Screen Options tab at the top of the screen and checking BuddyPress.
Now add a selection of the BuddyPress pages and your normal pages to the navigation menu. I’m adding these pages:
Activity (with Messages and Notifications as second level links beneath this)
Friends
Groups
Profile (with Settings at the second level)
Log Out
Log In
Registration.
All of these apart from the last one are taken from the BuddyPress list on the left: the Registration link is taken from the Pages list. I’ve changed the link text for Registration to Join, to make it more direct.

Now click Save Menu to save it.
Here’s how the site looks with the new theme and menu:

Next I want to add some widgets to display activity and help users navigate around the site.
Adding Widgets
I’m going to add widgets to my sidebar and header widget areas, plus the four footer widget areas. If you’re using a different theme you’ll probably have different widget areas. Also the widgets you have available to use will depend on the components you activated at the beginning.
Add these widgets to the sidebar widget area:
BuddyPress Log In
BuddyPress Sitewide Notices
BuddyPress Friends
Add the Search widget to the header widget area, if your theme has one. If not, it’s a good idea to add it to the sidebar.
Here are the widget areas I’m adding:

Next, I’ll add three BuddyPress-specific widgets to the first three footer widget areas:
BuddyPress Who’s Online
BuddyPress Recently Active Members
BuddyPress Groups

Finally, add a text widget to the fourth footer widget area, with some explanatory text about the community and a link to the registration page.

Managing Your BuddyPress Site
Now that your site is up and running, the next step is to promote it and encourage people to join. What you’ll need to do will depend on the nature of your community: if your site is for a small, already established group or team that shouldn’t be too hard; if it serves an existing community you’ll have to spread the word and encourage others too; and if you’re looking for a wider audience and/or selling membership, you’ll need a robust marketing plan.
Once people start joining there are tasks you’ll have to keep on top of as the site administrator:
Keeping your site up to date, including WordPress, the BuddyPress plugin, your theme and any other plugins you have installed.
Testing the site when updating to ensure no problems arise (it’s good idea to test updates on a development or staging version of your site first to be safe).
Keeping regular backups with a plugin like Snapshot Pro.
If necessary, moderating the community and resolving any complaints or disputes.
As your community grows, moderation is likely to become more important. It’s a good idea to define some community standards or guidelines right at the start and create a page for these on your site, so people know what’s expected. These will include guidelines about spam, trolling, use of profanity, personal attacks, spammy links, uploads and more. What you include will depend on you and your community, and may evolve over time.
As the administrator you can delete a user’s account if they breach the community guidelines, but it’s best to delete specific posts or interactions first if they’re inappropriate and/or contact the user about it. You’ll have to find a balance between preventing unacceptable behaviour and being heavy-handed – if you’ve been following the rise of Facebook and twitter, you;’ll know how hard this can be!
If you find that the metadata relating to your community is incorrect following an update or restore, you can use the BuddyPress Tools screen to fix specific data:
Count friends for each user
Count groups for each user
Count total members
Repair user “last activity” data.

Summary
BuddyPress is a powerful tool for creating online communities, which you can use for anything from a small team to a massive network of people across the world. It has the flexibility to accommodate a variety of uses, because you can switch components and settings on and off according to the needs of your site.
In this post you’ve learned how to install and configure BuddyPress, add BuddyPress pages to your navigation menu, insert BuddyPress widgets into your theme’s widget areas, and use dummy data to test your community.
Now that your site is up and running, all that remains is for you to encourage people to join, and to start a conversation with them. Enjoy!
What do you use BuddyPress for? How does it enhance your community? Add your experiences in the comments below.
you can also view the video below:-


")


")
0 comments:
We Cherish Your Comments Most, Kindly Drop your comments below. Don't forget to click "Notify Me" to know if we have responded to your comments, Thank You.