Apr 25, 2018

Easy Step by Step Guide on How to Backup Your Computer Files

Easy Step by Step Guide on How to Backup Your Computer Files

Easy Step by Step Guide on How to Backup Your Computer Files


I can't remember what my new year's determination was last time around. One thing I can say with near hundred percent certainty is that whatever it was, I failed to keep it. Maybe you're the same. Maybe you resolved to quit smoking, lose weight, or read more. We all make promises to ourselves, then fail to keep those promises. Worst of all, those promises might be exactly what we need most. Consider this: When was the last time you backed up your computer files? Last month? Last year? Never?

Let's promise to back up our computers. It's important, I promise. Just yesterday the automatic backup feature in MS Word saved me about an hour's work when my computer froze up. Given that I haven't backed up my computer in almost a year, I can't even imagine how much data I'd lose if I suffered a power surge or hard drive failure. It can happen to the best of us and often does. Even high end hard drive manufacturers report an average failure rate of between five and eight per thousand every year.


That may not sound like much, but let's face it, somebody has to be those five to eight people. Feeling lucky? There are about 185 million household PCs in the U.S., according to Computer Industry Almanac, so that means about 150,000 hard drives fail each year. But even if your drive stays intact, about a tenth of all computers suffer minor data loss in any given year.

power surge, the magnets in your home stereo speakers, or even an accidental nudge can affect data storage. According to a report from the ONTRACK data recovery service, data loss can be caused by natural disasters (3% of cases), computer viruses (7%), software problems (14%), and plain old user error (a whopping 32%). Now, I'm sure you never hit a wrong keyboard button, but do you have a button on your computer that prevents a bolt of lightning? I didn't think so.


WHEREAS our data is important, and disaster can befall even the noblest and undeserving of us, BE IT RESOLVED that you and I shall back up our computer files forthwith. Amen, brothers and sisters. Now, where and how do we start?

Steps on how to back up your computer files

STEP ONE: Choosing Favorites

Not all your files are important enough to preserve for posterity. The most precarious files on a computer are its operating system files. If you're a good little consumer, you bought the operating system and kept those CDs handy and secure from data loss. If you're not, then remind yourself to go stand in the corner later. The drones at Microsoft did not work for years just to watch you steal their work. Its people like you that keep Bill Gates from buying his second planet. Now that you've been suitably chastised, either go buy a legal copy of the operating system or include the necessary files in your "must back up" list.


The same principle goes for software applications. Maybe you bought an ad and spyware blocker you really like, but the company that coded it has since gone out of business (perhaps because other consumers weren't as scrupulous as you). If so, include the files you need to run the app in your list. Now it's time to look at the remaining files on your computer and order. If you're not a digital packrat like me, it may be possible to save everything. If so, congratulations. I don't have ten gigabytes of portable media at my disposal, so when I back up my computer, I'll be leaving a few gigs of MP3s and questionable Windows Media files at risk.

STEP TWO: Where You Can Put It

That's right, this is the section in which I'll tell you where to store your data. It's not a good idea to put backup files on another drive on the same computer. That defeats the whole purpose. Duplicating your files on another computer in the same LAN is almost as risky because computer viruses can spread as fast as an imaginary Anna Kournikova JPEG. You need to find a portable storage medium that can hold all the files on your list. Your options include floppy diskettes, portable hard drives, optical drives, tape drives, and remote servers.

STEP THREE: Get it Done

Now it's time to put the files you want to save on the storage medium you've chosen. There are several ways to do this. Your CD writer, for example, may come with proprietary disk writing software. That application may even include a backup option. If it does, and you're more familiar with that software than Windows features, then that's the way to go. Otherwise, backup is still relatively easy on all MS operating systems since Windows 98. Windows 98, Windows ME, and Windows XP Professional include a built-in Backup utility. To run it, just click on Start, then Programs, then Accessories, then System Tools, then Backup.


How easy was that? If you're using the XP Home edition, you may need to add the utility manually. If so, insert the Windows XP CD into your disk drive and wait for the "Welcome to Microsoft Windows XP" screen. (You may need to double-click the CD icon in My Computer.) Then click on Perform Additional Tasks and Browse This CD. In Windows Explorer, double-click the Value Add folder, then Msft, then Ntbackup. Double-clicking on Ntbackup.msi will install the utility. Once it's installed, you can also run the program by clicking Start and Run, then type msbackup.exe (Windows 98 and Windows ME) or ntbackup.exe (Windows XP) in the Open field. Click OK, and you'll be off to the races.


Don't let another month go by without protecting the files you value most. My girlfriend justifies her messy car by saying she "lives out of it." Well, I live out of my computer. It's not just my office; it's the home of cherished memories in the form of pictures, MP3, and other data files. I'm resolved to keep it safe.

Apr 22, 2018

Your smartphone three navigation buttons not working? Here is a simple trick on how to navigate without them

Your smartphone three navigation buttons not working? Here is a simple trick on how to navigate without them

Your smartphone three navigation buttons not working? Here is a simple trick on how to navigate without them

Are you one of the victims that got affected by the navigation button? Don’t worry you are not alone, today in this post you are going to learn the simple and best way on how to navigate through your smartphone without those three buttons.

Sometimes when your smartphone sensor got affected either by crack or It just felled and you pick it up you find there is no any sign of crack, in some circumstances you will realize that these three buttons that help you navigate in your mobile phone definitely stop working and maybe you are using a mobile phone that it’s very difficult to find it spare part in a market. if that is the case today after reading this short article you will be able to use your smartphone without using those buttons whether they are working or not as far as the sensor is working your smartphone will be okay.

Untold Step On how to use extra smartphone navigation button


First, you need to download and install an application from google play store called “Soft keys – Home Back Button” or you can easily download it here. This application is very simple and easy to use, it may be seen as a poor application but it is very flexible and perfect.

Your smartphone three navigation buttons not working? Here is a simple trick on how to navigate without them

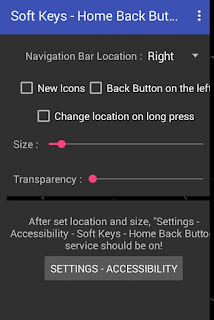
After installing the application in your smartphone, run it (open it) you will be greeted with the home page where you can make settings and changes to the application; but first you need to make the application active so that the operating system can recognize it, to make it active simply go to your smartphone settings>> All settings >> Accessibility you will now see the application name written there “soft keys – Home Back Button” click on it, simply change its position to active by clicking on the turning on icon which is located at the top right-hand site.


You can also turn the application active by clicking on the “settings – Accessibility” which is provided in the homepage of the application you will be redirected to your smartphone settings on the page that you have just landed you will see the application name written there as “soft keys – Home Back Button” click on it, simply change its position to active by clicking on the option button which is located at the top right hand side of the screen.

Now you have successfully turned on the application but you have to make some changes to make it more accurate so now, simply go back to the application or restart the application you will still be landed to the home page of the application which also serves as the setting page.

Once you log in the application the first thing you will see on the list is a drop-down menu, which is indicated as “Navigation bar location:” with this you can easily decide where you want the navigation button to appear either button, left, right or top as for me I will leave it in button position.


The next provided button is “new icons” if you wish to use this you can easily click on it to make it active the important of this button is to change the icon of the navigation buttons to the new icons which are mostly use in those new smartphone versions.

The next one after the new icons is the “back button on the left” this allows you to change only the position of the back button to either left or to right.

Size: this allows you to change the size of the added icons base on your needs you can easily increase the size of the icon by dragging from left to right while to decrease is by dragging from right to left.

Transparency: is the last provided button in the application which allows you to change the transparency background of the icons from dark to light or from light to dark and that’s all about the application.

Your smartphone three navigation buttons not working? Here is a simple trick on how to navigate without them

Conclusion: This application is somebody great work but it really helps a lot, nowadays when your smartphone navigation button stops working or get affected you don’t need to worry anymore deciding where to take the phone or where you can get it repair you can easily use this simple method to continue working with your smartphone without any distraction.


I hope this post really helps. Feel free to let us know in the comment section below if you have any idea on how to use your smartphone without those three navigation buttons. Don’t forget to share this post with your lovely ones. 

Apr 15, 2018

How to Enable Google AdSense Auto ads for your blog (Complete Guide)

Google AdSense is the best ads network on the planet, every blogger's dream first is to get AdSense approval and start earning some money online. Although there are a lot of ways on how to get money online AdSense serve as the best among because of its innovation, user-friendliness and overall experience.

On last few months AdSense teams successfully launched its new feature to every publisher which is google Auto Ads that help to optimize revenue. Google AdSense Auto Ads is a machine learning (artificial intelligent) that automatically read your blog and provide a good friendly advertisement.

Steps on How to Enable Google AdSense Auto Ads      

Login to your Google AdSense account
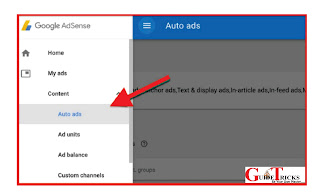
Go to my Ads > Auto Ads
Click on ‘Setup Auto Ads’
How to Enable Google AdSense Auto ads for your blog (Complete Guide)

Configure your Global settings
Enabling’ automatically get new formats at the bottom.
How to Enable Google AdSense Auto ads for your blog (Complete Guide)

Click on Save.

Now place the ad codes on every page of your blog/website. I use Google tag manager for the same. You can use any technique suitable for you. If you are already using Page level ads, you don’t need to do anything. You can always check the performance of Google Auto ads by going to My Ads > Auto ads and clicking on Statistics.
How to Enable Google AdSense Auto ads for your blog (Complete Guide)


Let us know of your experience with AdSense auto-ads. Have you implemented it already? If not, when do you plan to implement it? Feel free to ask questions and share your experience in the comment section below.

If you find this tutorial very useful, share it with others on Facebook, WhatsApp, and Twitter.

Here are a few other hand-picked articles for you to read next:


Apr 13, 2018

Everything You Need To Know about Google AdSense Auto Ads


Welcome to Guide Tricks today I am going to discuss about the new feature added in Google AdSense which is Auto Ads, Google AdSense is one of the most popular and well know best ad programs now a day. Even though there are some good alternatives that work perfectly, but none has consistently beat AdSense in terms of innovation, user-friendliness and overall experience.

Also Check: The Secret of Making Money on the Web


On February 21, 2018 AdSense team successfully introduced Google Auto ads for every user. This is one of the biggest improvement from the AdSense team in the recent time. In fact, Auto ads are expected to change the way you have been using Google AdSense before. One of the biggest concerns of most AdSense publishers is the ad placement, ad optimization and maintaining a pleasant user experience. Google Auto ads are utilizing artificial intelligence to automatically manage ad placements and ad optimization for the publishers.

Must Check: Eight (8) Best Ad Networks For New Bloggers (with Fast Approval) in 2018


I’m very optimistic about the future of AdSense auto ads as it will take away the pain of ad optimization and a blogger can only focus on building content while the AdSense takes care of the rest. Google AdSense was always a plug and play ad program, but now it’s completely automatic. Thanks to artificial intelligence

Important things you should know about AdSense Auto ads

Auto-ads is not going to be a problem for anyone is using Google AdSense. However, before you start setting up Auto-ads in AdSense, here are few things I think you should know. This will also answer your questions before you start integrating it.

==> If you already have Google AdSense ads placed on your blog, you can decide not to remove it. AdSense auto ads will automatically detect those ads and place more ads accordingly.

Also Read: Seven simple ways How People are making money online and how should also make yours


==> Already using Anchor or Vignette ads? Auto ads include Anchor and Vignette ads and many more additional formats such as Text and display, In-feed and Matched content ads. Note that all users that use Page-level ads will automatically be migrated to Auto ads without any need to add a code to their page. However, logging in to your AdSense account and setting up Global settings for auto-ads for the first time is the best good idea.

If you find this tutorial very useful, show your appreciation by dropping your comment in the comment section below and don’t forget to share it with others on Facebook and Twitter.

Here are a few other hand-picked articles for you to read next:


Apr 10, 2018

I have a perfect website running on localhost 8080 how would I find a domain for it?


This is one of the major questions I got from many people so I decided today to explain what to do when your website is running on localhost. Well, first I would like to let you know that when your website Is running on localhost that doesn’t mean that your website will be found on the internet you need to do something before it would be active on the internet. By the way, What is localhost?

Must Check: What You Should Know About Bluetooth Technology


Localhost is the standard hostname provided to the address of the local computer in computer networking. The localhost denotes the hostname used in communicating with the loopback network interface; that is, with software on the computer that originated the transmission. It’s also a reserved top-level domain name set. It only works in your computer means it can only be operated in a computer system that already contains the localhost without sharing it to anyone. You can easily read more about localhost here.

When you completely finished designing your website in localhost in other to be found on the internet you need two major and important things which are “Hosting” and domain. what are Hosting and Domain?

Must Read: How to Store your files and documents on the internet for free!! 


A web hosting is a type of Internet tools or service that allows individuals and organizations to make their website accessible via the World Wide Web. Normally hosting comes in different size and bandwidth before you own your own hosting you have to be paying some amount of money either monthly or annually to make it active it depends on how you wish, but there some other good companies that provide free hosting for a lifetime.

Domain Simply means is a service that allows a user to have his own unique address name for either blog or website that can be used all over the world and with the unique address can be used to visit the page, example www.jamb.org, www.fceyola.edu.ng, www.guidetricks.blogspot.com,  www.google.com.ng. so also like hosting before you have your own unique URL address active in the internet you need to pay and be renewing it at the end of each month or year it depends on your wish, if you cannot afford to buy or to renew it annually you can try some other companies that provide free domain name for your website.   

Check out: How to create your own social networking


So when you have your own unique hosting and domain name you can now easily move your site from localhost to online server which would enable people to see your website live on the internet.

And that’s for today if you found it post very helpful show your appreciation by dropping your comment in the comment box below and don’t forget to share this post with your lovely one's happy moving!!  

Apr 9, 2018

How To Delete Cookie Files From Your Computer

Do you know how to delete cookie files from your computer? If not, here are some simple guidelines. First of all, let us begin by clarifying what a cookie is. Cookies are small pieces of text generated by a web server and stored in the computer of an internet user when he or she visits a website that offers cookies. The cookie is a unique identifier that the web server places on the computer hard drive and this allows organizations to store information on the user`s machine and to later retrieve it. There are of course various genuine and beneficial uses for cookies but due to the potential for abuse, it is important that you know how to delete cookies from your computer.

Must Check: How to install windows operating system 


A variety of information can be stored in a cookie file. Some organizations use cookies to track your every move on their site, others store user identification and passwords in order to save repeat visitors having to fill out form information each time they visit. However other organizations may use cookies to profile user habits and browsing habits and that information can then be passed on to others for advertising purposes.

How To Delete Cookie files:

Internet Explorer:

Internet Explorer 6 for Windows 98, Windows 98 Second Edition, Windows Millennium Edition, Windows NT 4.0, Windows 2000, and Windows XP
Start Internet Explorer.

==> On the Tools menu, click Internet Options, and then click the General tab.
==> In the Temporary Internet Files section, click Delete Cookies, click OK, and then click OK again.

NOTE: If using an older version of Internet Explorer then you will need to manually delete the cookies from your hard drive as follows:

1.===> Start Internet Explorer.

2.===> On the Tools menu, click Internet Options, and then click the General tab.

3.===> In the Temporary Internet Files section, click Settings. Click View Files.

4.===> On the View menu, click Details.

5.===> Click the Internet Address column header and then find the Internet addresses of the cookie files. For example, a cookie Internet address may be named similar to the following name: Cookie:[email protected].

6.===> Click a cookie file, and then press DELETE. If you are prompted to confirm that you want to delete the file, click Yes. Repeat this step for each cookie file.

Firefox:

1.==> Click the Tools menu followed by Options.

2.==> Highlight the privacy button.

3.==> Click the clear button next to the cookies button.

4.==> Click the clear button next to the cache button.

Google Chrome:

1.==> Click on the options button which is located in the header of your browser.

2.==> Goto More tools and click on Clear browsing data or press CNTRL + SHIFT + DEL on your keyboard.

3.==> Now choose Cookies and other site data and Cached images and files by ticking the box provided. 

4.==> Now click on the “Clear Data” you are done!

UC Browser:

1.==> Click on the options button which is located in the header of your browser.

2.==> Goto Clear browsing data or press CNTRL + SHIFT + DEL on your keyboard.

3.==> Now choose Cached images and files and Cookies and other site data by ticking the box provided.

4.==> Now click on “Clear browsing data” you are done!


This is an easy and little tutorial on How To Delete Cookie Files From Your Computer. Now It's your turn to share this post with your friends and write your views in comments Box Below Happy Scheduling!

Apr 2, 2018

WhatsApp new Feature:  WhatsApp now allows you to add Group Description
WhatsApp new Feature:  WhatsApp now allows you to add Group Description  


Some day’s back WhatsApp have successfully added a new feature to its application which allows users to add and edit a description of a group. This feature works in any type of phone as far as WhatsApp support in that mobile phone. Although we all know that this is not a new feature to other social networks like Facebook and telegram because it has been existing since but this is the first time that WhatsApp added this feature to its users.   

This is mainly designed to help group admins and those responsible for managing groups in WhatsApp to add description about the group that is what the group is all about e.g. mission and vision of the group, Aims, and objective etc. you can also add rules and regulation using this feature so that to allow the new members to see without distraction. And this description will be visible to only participants and people invited to the group.

This feature is not restricted to other group members, both the admins and the members can be able to add and edit a description of the group.  

Steps on how to add Group Description in WhatsApp   


      1.    Enter the group you want to add the description

   2. Click on the name or header of the group (where you add and remove members)
WhatsApp new Feature:  WhatsApp now allows you to add Group Description

      3.    You will see “add group description” click on it
WhatsApp new Feature:  WhatsApp now allows you to add Group Description


     4.    A form will appear to add your text (you can also add similes) and don’t worry if you make any mistake you can re-add or edit it later.
WhatsApp new Feature:  WhatsApp now allows you to add Group Description


     5.    After writing it hit on the “ok” button this allows your data to save.

That’s it! You are done!

So, this was all about how you can add group description in WhatsApp. Subscribe to Guide Tricks & if you like this post or you found it very helpful don’t forget to share it with your lovely ones. Keep visiting for cool tips and tricks Thank You.