Mar 31, 2018

What is two-step verification it's important and how to set it up in WhatsApp

We all know that WhatsApp is one of the most popular social networks nowadays and also a good place to interact with our lovely ones, WhatsApp allows us to send text, picture, audio, file and even to make voice and video call with small charges and this is a good achievement.

But there a lot of problems govern the social network most of our people now days or I should say must of our enemy’s always try to find out our secret or some things that we have done wrong to serve as evidence that will enable them to spoil our name in a society other uses our social media to crack or hack and find information while others use our mobile phone because nowadays those are the major things we use.

Keep in mind no matter how smart you feel you are you will definitely find someone that is smarter than you, someone that is looking for your property knows the best way to follow no matter how tough it is. That’s why the WhatsApp official added a new feature which is “two-step verification” that would make your account more secure and free from crack or hack.    

What is two-step verification in WhatsApp?

Well, this is a feature that is added to WhatsApp to make the account more secure and free from any hack or crack, this two-step verification served as a key to your WhatsApp details with the help of this new feature no one can be able to access your WhatsApp using some other technical form. This is a security which will require a pin when registering your phone number with WhatsApp again e.g. changing of number or changing of a mobile phone.

Why you should add two-step verification in your WhatsApp

With this new feature you will be free from an unknown hack or crack, I think a lot of gateway of WhatsApp hack or crack will be reduced, it serves as save guard to your account you really need to set this security to your account to make it more secure it takes some few minutes to set.

How to set two-step verification in WhatsApp

Well, this feature works in any kind of device as far as the device supports WhatsApp application but I am not sure whether it is located in the same place in android or apple but for this tutorial, I will be using an android phone to serve as a sample.

Steps you need to follow

       1.    Open your WhatsApp application

   2. Simply Go to settings >>> click on accounts >>> and choose Two-step-verification    
      
      3.    Now click on the “Enable” the next you have to do is to provide six (6) digits that you can easily remember insert them and click on the next button it will ask you to re-enter the security code again do so by re-adding the digits you have provided before and hit the next button.

    4.    It will ask you to provide your unique and active email address to your account which will be used to reset your pin in case you have forgotten it do so to make your account more secure, if you don’t have an email address this post would guide you on how to create unique email address using Gmail. So after you have provided your email address hit on the next button to proceed.       

     You will be asked to reconfirm your email address to avoid future problem do so by re-typing your email address and click on the save button. That’s it!! You are done!!    

So, this is all about how to set up two-step verification for your WhatsApp account to make it more secure. if you like this post or you found it very helpful make sure to share it with your lovely ones. And don’t forget to subscribe to Guide Tricks Keep visiting for cool tips and tricks and tutorials Thank You.

Mar 29, 2018

WhatsApp Tricks: how to Delete message that have been sent mistakenly
WhatsApp Tricks: how to Delete message that have been send mistakenly
WhatsApp Tricks: how to Delete message that has been sent mistakenly 

Sending of message mistakenly or typing error in WhatsApp is day to day activities and it happens to everyone, sometimes when you send a message and It doesn’t have to be were you have send it you need to apologize to the person that you have send to, that’s why today I decided to show you the best way on how to delete a message that you have mistakenly send in WhatsApp.


Somedays back WhatsApp has successfully launched it new features which allow users to delete a message that has already been sent using a simple method, this feature works perfectly on any device that supports WhatsApp application.

Steps on how to delete a message that has already been sent in WhatsApp


       1.    Click and hold the message that you have just send

       2.    Options will appear at the top middle site of the page
WhatsApp Tricks: how to Delete message that have been sent mistakenly

       3.    Now click on the delete button which is represented as the recycling icon

      4.    Options will appear to you which are “Delete for me”, “Delete for Everyone” and “Cancel” 
WhatsApp Tricks: how to Delete message that have been sent mistakenly

    the difference between the two major buttons are: when you click on the first one which is “Delete for me” this will definitely delete for you means it will automatically disappear from your screen and you will never see it again but the other user mean the receiver can see it every time unless he also deletes it. While the second important button is the “Delete for Everyone” ones you click on this button the text that you have sent will eventually disappear but you the sender and the receiver will not be able to see that text it will automatically change to ‘You deleted this message’. That’s it!! And You are done!

    
    Note: there are some difference which you need to know; if you are the one that sends the message the receiver can only delete for himself but he can’t delete for both of you, but the sender can delete the message for both of you.   


So, this was all about how you can delete a message that is mistakenly sent in WhatsApp. If you like this post or you found it very interested don’t forget to share it with your lovely ones and make sure you Subscribe to Guide Tricks for cool tips and Tricks Thank You.

Mar 25, 2018

Top 6 reasons why women turning their head towards online shopping

As the technology is growing and more people using the technology tools, online shopping has made the first choice of people. They can shop anything now from online. As digital marketing has grown-up it is beneficial for both the businessmen and customers. As business owners can make their business online and customers get the products easily, also they can get the products which are not available at the nearest supermarket. Online shopping is getting famous women more as they can now shop by sitting at their home and at huge discounts.

There are many reasons why women are turning their heads. Top 6 are listed and explained below, have a look-

No traveling-

No traveling means no traffic and headache in finding the place to park the car. This saves the time. And of course, you don’t even have to get ready and take out your new clothes every time whenever you go shopping. In the winter mornings, you can chill out in your garden or terrace under the sunlight and can shop on your smartphone or on the laptop. No waiting in the huge billing lines as the payment mode is so comfortable in online stores.

Hasel-free shopping-

So by shopping at the online store, you can buy items related to Online Electronics Store UK and so on. You can take delivery of items at your home or at any place you just need to type the address when making payment online. You don’t need to look different sites and stores for buying different items such as jeans, tops, Kurtis, lingerie you can have them all right on your computer screen.

Choice-

The choice in the offline stores is limited to the space that they have to display their items. But, in the online store's space is not required everything is placed on the Best Cheap Online Clothing Stores UK you have the chance to see the huge collection of clothes shoes and other items. Online shopping is especially great when you are shopping for the sale and discounted items. The saving is easy with online shopping.

No waiting-

You do not have to wait for the huge traffic and billing counters of the malls and physical stores because online stores have cut all these difficulties. If you like something and want to buy, you have to wait to click on the item and add it to cart and make payment. Al the process will take 5-6 minutes of yours.

No bags-

Yes, the most tiring thing about the offline shopping is to carry the bags. If you shop with your husband you give him some bags to carry, but most of the men hate this. Now you don’t have to worry about this either as in online shopping you don’t have to carry any bag. The salesman will come to your house and deliver the item. No more hand pain and fights with husband.

Easy returns and exchange-

You have noticed that some stores do not exchange or return the money after their customer has brought the item. But, in online shopping, you have this option. If you don’t like the stuff and it is not looking good on you, you can e-mail your request to exchange or return the item and it will be returned soon.

Author:

The writer is an expert in the field of online selling websites. For more information about Womens Fashion Online contact Angliamarket.com.


Mar 19, 2018

Where Do Deleted Files on Your Computer Go?

Most of you reading this post must have at one point or the other doubted where the files you deleted on your PC is going. Did they go into this or were these files just forgotten forever by your PC? Well, the answer might not be what you’ve been thinking. When you delete a file, the computer sends it to a temporary directory (Recycle Bin or Trash) where it awaits your final decision as to whether you still need to resurrect the file (Restore it) or not. But when you go ahead to delete the file from the Recycle bin (Empty the Trash), the space the said file occupied isn’t actually emptied but marked as empty and it’s now available for new files to move in What actually happens is that the file hasn’t actually moved out, but the pointers to the particular file has been removed making it impossible for your Operating System to locate the said file. But with recovery tools, you could locate those file which was deleted because they still exist on your drive.


Now, when you get new data into your PC and your OS has no other space to place this data, it starts overwriting the space marked as empty, and that’s the reason when you restore some deleted files, they might appear corrupt since other files have overwritten some part of its data. Therefore, the key to restoring a perfect file after having being deleted is to perform a recovery not long after you had deleted it. Well, not exactly. As you must have now known, deleting a file only removes pointers to the said file, but the file gets overwritten when new files occupy the space marked as empty. The only other perfect way to have a file deleted and return a zero file even when instantly recovered using recovery tools is to do what is called a “zero filling “. Zero Filling involves filling every byte of the original file with a “0” and then deleting the file. That way, even if you do restore the data in the file table, all you’re going to get back is an empty file. It effectively ensures that the disk sectors are already overwritten at the time of deletion.

Mar 16, 2018

How to install a windows operating system


Hello welcome to Guide Tricks in today’s post I am going to explain how to change operating system of a computer, Installing Windows might sound like a formidable task but it's really quite easy, especially if you're installing a more recent operating system like Windows 10, Windows 8 or Windows 7. No need to take your computer into the local experts for a simple reinstall - you can install Windows all by yourself!


sometimes when things go wrong in your computer you need to know how to fixed it don’t always depend on others. Take life very easy and always try to change yourself and keep in mind those people that always help you wither free or not can’t stay in your life forever trying to help you.


Some other things are really easy in computer you just need the method and steps that’s why today I decide to show the simplest way to change and operating system for a pc. This method can be used in changing any type of operating system whether windows O.S, Linux etc. in any product of computer.

Requirements
·        ISO Image (operating System setup)
 I recommended you to read my previous article on How to create bootable pendrive for windows installation

Step 1: Make sure you turn off your Computer system

 Step 2: insert the USB pen drive or CD plate (bootable)

Step 3: boot your computer with the bootable USB or CD plate (check your bios setting for booting with USB enable USB as booting Device) usually pressing F12, Del, f2, f10 or 79 at startup will guide you to the boot menu but it still varies from manufacturer. When you are using windows ones you plug the USB sometimes it will automatically boot from the USB by himself.     

Step 4: after booting, if you use YUMI software in making a bootable; a page will just appear with YUMI diagram as shown below or jump to step 5

How to install a windows operating system


Now simply choose the “other operating system and tools” by using the mouse or by navigating through the use of arrow keys and hit the enter button a new page will still appear now choose the type of windows you create before proceeding.

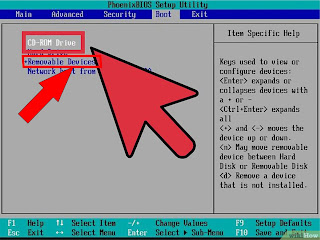
Step 5: To enter the system BIOS, the key to enter the BIOS is usually shown on the screen. Find your BIOS's boot options menu. The boot options menu of your BIOS may vary in location or name from the illustration, but you may eventually find it if you search around. If you can't find the boot options menu, search the name of your BIOS (most likely located in the BIOS menu) online for help.   

How to install a windows operating system 

Step 6: Select the CD-ROM or USB drive as the first boot device of your computer. Although this method may vary among computers, the boot options menu is typically a menu of movable device names where you should set your CD-ROM or USB drive as the first boot device. It can also be a list of devices that you can set the order of their boot on. Consult a manual or the internet for help if you're stuck.
How to install a windows operating system

Step 7: Save the changes of the settings. Press the button indicated on the screen or select the save option from the BIOS menu to save your configuration.
How to install a windows operating system

 Your system will automatically reboot himself. Windows Setup will begin loading.

How to install a windows operating system

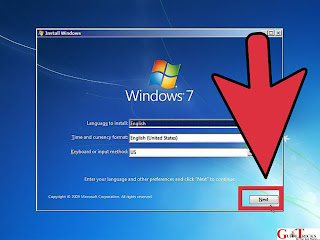
Step 8: Choose your Windows Setup options. Once Windows Setup loads, you'll be presented with a window. Select your preferred language, keyboard type, and time/currency format, then click Next.
How to install a windows operating system

 Click the Install Now button.

How to install a windows operating system

Step 9: Accept the License Terms. Read over the Microsoft Software License Terms, check I accept the license terms, and click Next. 

How to install a windows operating system

Select the Custom installation.
How to install a windows operating system

Step 11: Decide on which hard drive and partition you want to install Windows on. A hard drive is a physical part of your computer that stores data, and partitions "divide" hard drives into separate parts. If the hard drive has data on it, and you want to delete it, or format it. Select the hard drive from the list of hard drives. Click Drive options (advanced). Click Format from Drive options. If your computer doesn't have any partitions yet, create one to install Windows on it. Select the hard drive from the list of hard drives. Click Drive options (advanced). Select New from Drive options. Select the size, and click OK.
How to install a windows operating system

Step 12: Install Windows on your preferred hard drive and partition. Once you've decided on where to install Windows, select it and click Next. Windows will begin installing wait until it is through.

How to install a windows operating system

Note: When the installation is about to complete that’s the final stage when you see “Windows needs to restart to continue” kindly unplug the USB or the CD PLATE before it shutdowns and don’t insert it again, the system may still reboot and continue the installation without the bootable USB or CD PLATE.  
You are done.

How to install a windows operating system

You can also watch our video tutorial on how to change operating system of a computer.


This was today’s tutorial on how to change Computer operating system. Hope you guys like this. Please leave your comments and feedback below this post.


Mar 14, 2018

The Secret of Making Money on the Web


So, you really want to know the secret formula of how to make some money out of a home business on the Web? Well, that formula is J.F.D.I.
Just

Flaming

Do

It

Simple!

No, I am not being frivolous - that really is the secret formula to success! - please read on for the full explanation. How long have you been surfing around looking for the "right" opportunity? How many people do you know who have said "One day, I will be a millionaire - when I am lucky enough to find the right deal"?


The main difference between those who DO, and those who just think about it, is just that - they DO, the rest of the population simply thinks about doing! The well-known American author, Sinclair Lewis was touring the Universities and Colleges in the Mid-West, lecturing on the Art of Creative Writing. At the start of his lecture, he would say to the packed lecture theatre, "How many of you would like to be great writers?"


Invariably all the eager students would raise their hands, and Lewis would retort, "Well why are you not at home writing?" The point he was making was that in order to write a great novel, one had to possess the self-discipline to actually sit down and write! Without that, it did not matter how many lectures they attended or books on How to Write a Novel they read, the main thing was to begin writing.

Exactly the same is true of running a profitable business on the Web (or anywhere else). All Lewis's students needed to write was a pen, paper and an ample supply of ideas - and a determination to write. All YOU need is a PC, some ideas and the same determination to succeed. A few dollars/pounds/escudos will help, but the beauty of the Web is that you can start out and, at least in the early days, you need spend next to nothing. Many of the programmers I will introduce you to are totally free and on the others you can usually start off without committing any cash, only signing up when you are confident of the service offered and your ability to promote it.


You can be taught how to set up a successful business, how to make money from someone else's idea, how to set it up, how to market it, how to advertise, even how to keep your accounts and keep the tax man happy, but however much you learn, you will never make any money unless you: - J. F. D. I!!!!

Mar 12, 2018

How To Download Paid Android Apps in Google Play Store For Free

Majority of people now days are using an Android device and they prefer to download and install newly developed apps on their smart Android devices directly. These new apps help in customizing your smart Android backgrounds. Most of the Android users download and install apps direct from the Google Play Store for commercial or personal use. There are lots of excellent apps developed by different people and they are available there. But there are some apps which are paid means you have to pay money in order to use or download them from google play store. So today at guide tricks, I will guide you the process to follow in other to Download Paid Apps for Free on your Android Smartphones. 


“How to Download Paid Android Apps in Google Play Store for Free” is the very searchable thing on the internet nowadays. you will be able to download nearly all paid apps of Google Play Store on your mobile without paying anything. Just follow the methods to download paid apps in google play store for free.
In this method, you need to download an Android app and install it in other to have paid apps for free on your smartphone device. Just follow the following steps to proceed.


DOWNLOAD AND INSTALL BLACKMART

ABOUT THE APP

BlackMart Alpha is a developed Android App which will provide you a link or you can say facility to download paid android apps for free or without paying. This android app is very popular as well and it also gives this cool facility to peoples. So, just keep on following me the methods to download paid apps for free is as follow:
STEPS
Step 1. Firstly, download Black Mart Alpha app on your Android device. And simply Install the app on your Android Device.

Step 2. Now Search for Any Paid Apps in Google Play store and copy the name of that app and also its version in the description of the app.

Step 3. Now Open Black mart app and in the search box enter the name of that app that you have a copy which you have searched on Google Play Store.

Step 4. Now download that particular app through Black Mart on your Mobile Phone.
That’s it! You are done! With the downloading of the paid app and you have it for free!!

So, this was all about how you can download & use paid apps for free using black Mart alpha application. Subscribe to Guidetrick & share this post if you like this post or you found it very interesting. Keep visiting for cool tips and tricks Thank You.

Mar 4, 2018

Apple granted patent for AirPods-style wireless charging case for Apple Watch ⌚
Apple has today been granted a patent for an Apple Watch charging carrying case which works like the AirPods case – providing somewhere to store the Watch when not in use, while simultaneously recharging it. The design is significantly different to that offered with the original $10k+ Apple Watch Edition.
While a charging case for a device typically worn all day might sound less useful than the AirPods case, it makes more sense when you read the details … In addition to the Watch itself, the patent describes the case having room for additional bands, some of which might be powered.
"Some embodiments of the disclosure pertain to a case that can securely hold and store a portable electronic device, such as a wrist-worn or other wearable electronic device, along with one or more bands that can be used with the device. Embodiments of the case can include circuitry that can charge the stored electronic device and some embodiments can further include circuitry that can charge the one or more bands stored in the case if those bands have electronic components, such as circuitry, sensors and/or batteries, that also require power."
So whether it’s a band designed simply to extend the battery-life of the Watch itself (something we’ve seen in both Apple patents and third-party product ideas), or a powered strap with additional sensors and gadgets, the case would recharge those too.
Additionally, a charging case might be more convenient than the puck when travelling, allowing an overnight charge without yet another thing to plug in overnight.


Twitter rolling out updated share icon with private bookmarking feature and DM tweets
Twitter today announced its highly anticipated private bookmarking feature, which is starting to roll out along with some other sharing options.
Twitter first announced the private bookmarking feature last October, noting that many users were requesting the functionality.
Naturally, Twitter shared the news about the rollout in a tweet, including a GIF showing how it works.
Now, the features that are housed in the new share icon include The social media service notes in another tweet that bookmarks are private along with some use cases.
The new features are rolling out starting today.