This system is Developed and Designed by Muhammad Abba Gana, it is intended to create and easily Voting for institute or organization using PHP and MYsqli. it has good graphical user interface and user interface and user friendly Environment.
The features of this system are as follows:-
1- Drag and Drop style of voting
2- add, edit delete voter
3- add, edit and delete candidates
4- count number of votes of candidates
5- form validator and CAPTCHA for voters registration
it is available in affordable price if you need it you can contact me on the following-
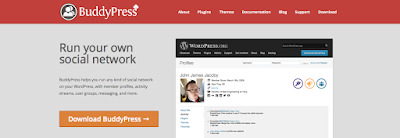
Turning your WordPress site into a community with BuddyPress has never been easier thanks to improvements in recent versions of the social networking plugin.
BuddyPress works great with a huge number of free and premium themes, and the BuddyPress components look great in responsive themes too.
If you’d like to turn your site into a community of users and add social media features, then the free BuddyPress plugin makes it possible. In this post, I’ll show you how to install and configure BuddyPress on your site. You’ll learn how to create pages for BuddyPress, to add these to your menu and widgets, and to test your site using test data.
If you want to learn all about BuddyPress before you start, then the dedicated BuddyPress site is a great place to go, and we also have plenty of BuddyPress guides here on WPMU DEV.
But for me the best way to learn anything is by having a bash at it, so let’s get started!
BuddyPress helps you run any kind of social network on your WordPress site.
Installing BuddyPress
The first thing you’ll need to do is install the BuddyPress plugin. I’m going to install it on a fresh WordPress installation, but you can also install it on an existing site.
In your WordPress admin screens, go to Plugins > Add New, and you’ll see BuddyPress displayed prominently in the list of available plugins. Click the Install button followed by the Activate plugin link, and BuddyPress will be installed for you.
You’ll be immediately taken to the BuddyPress welcome screen:
Here you’ll find various links to help you set up and manage your BuddyPress community. Start by configuring settings for BuddyPress.
Configuring BuddyPress
There are three aspects to configuring BuddyPress:
Selecting the components you want to include.
Creating pages.
Customizing settings.
The place to start is by selecting components, as that will have a knock-on effect on the other settings.
Activating BuddyPress Components
To choose the components you’ll be using, either click the Set Up Components link in the welcome screen or go to Settings > BuddyPress and select the Components tab.
By default, some but not all of the components are selected for you:
Depending on how you want your community to operate, you can select from as many as you want from the following:
Extended Profiles: customize user profiles and configure the available fields.
Account Settings: let your users edit their account settings.
Friend Connections: let users make connections with each other.
Private Messaging: Let users send each other private messages.
Activity Streams: display streams of activity on the site with direct posting to the front-end, threaded commenting, mentions and email notification.
Notifications: select this and your members will receive notifications of recent activity in the way that they select.
User Groups: allow the creation of user groups for people to create their own networks in your community.
Site Tracking: track what’s happening on your site (posts and comments).
BuddyPress Core: you can’t deselect this component as without it, BuddyPress won’t work!
Community Members: again you can’t deselect this as BuddyPress won’t function without members.
You can select as many or as few of these as are relevant for your site, and add to them at a later date if you decide to extend your community’s scope.
I’m going to select all of the components (maybe because I’m greedy, or more likely because I want to demonstrate them all here). Check all the boxes you need for your site and click the Save Settings button.
Configuring Pages
The next step is to configure the pages that BuddyPress will use. Before moving on to the Pages tab, however, you’ll need to create a couple of pages: for registration and activation.
Note: If your community is closed and people can’t register themselves (i.e. you’ll be adding all of the users manually), you can skip this step.
In your WordPress admin, go to Pages > Add New, and create the two pages as you normally would. Call one Registration and the Other Activation (or something different but meaningful to you and your users).
Once you’ve done that, you’ll see all of the pages in your site so far in the main Pages listing screen. BuddyPress has already added two more pages for you: Activity and Members. I’ve deleted the default ‘Sample Page’ that WordPress creates so I now have four pages in total.
Now you have your pages in place, you can configure them for BuddyPress.
Go back to Settings > BuddyPress and click the Pages tab.
Select pages for each function as follows:
Members: select Members.
Activity Streams: select Activity.
User Groups: select Groups.
Register: select Registration.
Activate: select Activation.
Click the Save Settings button. BuddyPress will automatically use those pages to display the appropriate content in your site.
Configuring Settings
Now that you’ve selected components and created pages, it’s time to move on to configure BuddyPress settings.
Click the Settings tab.
This screen gives you a number of options for features you can choose to enable or disable. These are:
Main Settings: enable or disable the toolbar at the top of the screen for logged-in users, and specify whether users can delete their account themselves.
Profile Settings: allow members to upload their own profile picture, and sync BuddyPress and WordPress profiles.
Groups Settings: let users create groups, and choose whether to allow customization of group avatars.
Activity Settings: enable activity stream commenting on blog and forum posts as well as BuddyPress updates, and auto-referees the activity stream in real time.
Select the ones that are relevant to your site and click the Save Settings button. I’m selecting everything (being greedy again!).
Configuring WordPress Settings
Now that you’ve got BuddyPress set up, it’s a good idea to configure your WordPress settings before moving on to adding your navigation menu and widgets.
In the Settings menu in the WordPress admin, edit these settings:
Permalinks: make sure pretty permalinks are turned on.
Reading: set this so that the home page is a static page, namely the Activity page. This will ensure that when your users open your site, they see recent activity. I’m leaving the Posts page option blank as my site doesn’t have a blog: if yours does, select the appropriate page.
Note: If you’re adding BuddyPress to an established site and want to keep your existing home page, you might choose not to have the activity page as your home page. But make sure your Activity page is nice and easy for people to find.
Change the settings on those two screens and click Save Changes for each.
Installing a Theme
Now you need a theme for your site. If you’re working with an existing site you can skip this bit as the chances are you’re happy with your existing theme.
A few years ago, you could only use a BuddyPress-compatible theme if you wanted to run BuddyPress, and if you wanted to use the plugin with your own theme, you’d have to add some extra theme template files to make BuddyPress work. If you’ve been told that you still have to do this, don’t worry: you don’t. Since version 1.7, BuddyPress will work with any well-written theme, although there will always be some themes whose layout and design suit BuddyPress better than others.
I’m going to use a theme called Spacious, which is free with a clean design that doesn’t detract from the myriad of content your users will generate and has customization options that mean you can tweak the design.
Go to Appearance > Themes and click the Add New button. Type spacious into the search box to see the theme displayed:
Click the Install button followed by the Activate link to install and activate the theme. If you’d like to customize the theme, you can do so via the theme settings screen or the customizer.
Adding a Menu and Widgets for Navigation
Next let’s add a menu and some widgets to the site to improve navigation.
Creating a Navigation Menu
If your site doesn’t already have a navigation menu you’ll need to create one and assign it to the primary slot in your theme.
Go to Appearance > Menus and click the create a new menu link. Name your menu, check the Primary Navigation checkbox and save it.
If you can’t see a section called BuddyPress on the left hand side, with all of the BuddyPress pages listed, you can turn it on by opening the Screen Options tab at the top of the screen and checking BuddyPress.
Now add a selection of the BuddyPress pages and your normal pages to the navigation menu. I’m adding these pages:
Activity (with Messages and Notifications as second level links beneath this)
Friends
Groups
Profile (with Settings at the second level)
Log Out
Log In
Registration.
All of these apart from the last one are taken from the BuddyPress list on the left: the Registration link is taken from the Pages list. I’ve changed the link text for Registration to Join, to make it more direct.
Now click Save Menu to save it.
Here’s how the site looks with the new theme and menu:
Next I want to add some widgets to display activity and help users navigate around the site.
Adding Widgets
I’m going to add widgets to my sidebar and header widget areas, plus the four footer widget areas. If you’re using a different theme you’ll probably have different widget areas. Also the widgets you have available to use will depend on the components you activated at the beginning.
Add these widgets to the sidebar widget area:
BuddyPress Log In
BuddyPress Sitewide Notices
BuddyPress Friends
Add the Search widget to the header widget area, if your theme has one. If not, it’s a good idea to add it to the sidebar.
Here are the widget areas I’m adding:
Next, I’ll add three BuddyPress-specific widgets to the first three footer widget areas:
BuddyPress Who’s Online
BuddyPress Recently Active Members
BuddyPress Groups
Finally, add a text widget to the fourth footer widget area, with some explanatory text about the community and a link to the registration page.
Managing Your BuddyPress Site
Now that your site is up and running, the next step is to promote it and encourage people to join. What you’ll need to do will depend on the nature of your community: if your site is for a small, already established group or team that shouldn’t be too hard; if it serves an existing community you’ll have to spread the word and encourage others too; and if you’re looking for a wider audience and/or selling membership, you’ll need a robust marketing plan.
Once people start joining there are tasks you’ll have to keep on top of as the site administrator:
Keeping your site up to date, including WordPress, the BuddyPress plugin, your theme and any other plugins you have installed.
Testing the site when updating to ensure no problems arise (it’s good idea to test updates on a development or staging version of your site first to be safe).
Keeping regular backups with a plugin like Snapshot Pro.
If necessary, moderating the community and resolving any complaints or disputes.
As your community grows, moderation is likely to become more important. It’s a good idea to define some community standards or guidelines right at the start and create a page for these on your site, so people know what’s expected. These will include guidelines about spam, trolling, use of profanity, personal attacks, spammy links, uploads and more. What you include will depend on you and your community, and may evolve over time.
As the administrator you can delete a user’s account if they breach the community guidelines, but it’s best to delete specific posts or interactions first if they’re inappropriate and/or contact the user about it. You’ll have to find a balance between preventing unacceptable behaviour and being heavy-handed – if you’ve been following the rise of Facebook and twitter, you;’ll know how hard this can be!
If you find that the metadata relating to your community is incorrect following an update or restore, you can use the BuddyPress Tools screen to fix specific data:
Count friends for each user
Count groups for each user
Count total members
Repair user “last activity” data.
Summary
BuddyPress is a powerful tool for creating online communities, which you can use for anything from a small team to a massive network of people across the world. It has the flexibility to accommodate a variety of uses, because you can switch components and settings on and off according to the needs of your site.
In this post you’ve learned how to install and configure BuddyPress, add BuddyPress pages to your navigation menu, insert BuddyPress widgets into your theme’s widget areas, and use dummy data to test your community.
Now that your site is up and running, all that remains is for you to encourage people to join, and to start a conversation with them. Enjoy!
What do you use BuddyPress for? How does it enhance your community? Add your experiences in the comments below.
Are you tired of somebody not replying to your email? How many times you heard this excuse “Hey Dude, sorry I forgot to check my email”. The things get worse as a blogger or a Freelancer, when your important emails are not replied.
Don’t you want to get notified when somebody opens your email? Sidekick by Hubspot is one awesome free service which let you know when someone has opened and seen an email. This is also important, when you want to track if an urgent email is not opened by a receiver, and you can send a reminder email for the same.
I started using Sidekick recently and find it to be very useful. Sidekick is not just to track email open, but it also let you schedule your email at the later time. Let’s have a look at all the features of Sidekick and signup using below link to enjoy their premium features free for one month.
Sidekick by HubSpot review: Your Email companion
To get started with Sidekick, you need to create a free account here. You can login using your Google account, which is a convenient sign-up process. After that install Sidekick Chrome extension from here.
From the Sidekick dashboard, you need to give access to your Gmail account (Don’t worry about account security, as HubSpot is one reputable company). You can also use Sidekick with:
Outlook desktop
Apple Mail
Outlook.com
Instructions are on your Sidekick app dashboard. Once you have configured your email service, after that Sidekick will keep tracking which emails are opened & which emails remain unopened.
It also let you track if the links in the emails are clicked or not. Here is a screenshot from my Sidekick app dashboard:
You have an option to uncheck any email which you don’t want to be tracked. Another useful feature is to send an email at the later time. You can schedule email, and Sidekick will automatically send it for you.
Scheduling email in Gmail:
After you have signed up for Sidekick and installed Chrome extension. Click on compose email, and at the bottom you will see an option to schedule email at the later time. Fir the first time, you need to give offline access of your Gmail account to Hubspot. (Here is a screenshot for email schedule feature)
Sidekick also has free iOS & Android app, which let you track everything from your smartphone. What I like about their smartphone app is, you can also send an email directly from the app. You can download apps from below link:
Entrepreneurs & startup should watch this video to understand how Sidekick app can help their business grow:
he free version let you track 200 emails/month. You can always upgrade or invite others to get free premium access for one month. When you signup from below link, you will get premium access for the first month.
Grab Sidekick free premium access
Once you start using Sidekick by Hubspot, I’m sure you would start loving the app. Go ahead, and try it. Here are few more chrome addons, which you might like to try right away:
Do let me know if you know of similar or alternate app like Sidekick. Don’t forget to share about this app with your friends on Facebook & Google plus.
In the world of Internet marketing, CTR matters a lot to Advertisers as well as to Publishers. Advertisers role is to create ad graphics or sales line, which should get more CTR and publishers role is to place the ad in such a way, which increases the CTR.
I have been seeing people asking about this question in many forums so this post will be helpful for many of my readers who are not aware of what is Click through rate?
From a Blogger/Publisher point of view, CTR is one of those factors that plays an important role in generating money and retaining the advertisers. If you fail to give enough click, your advertisers will run away. So, let’s dive into the world of CTR and understand what it is.
What is CTR?
TR stands for Click Though rate. In simple words, it means the number of times an advertisement is clicked divided by the number of times advertisement, ad unit or the page containing advertisement is viewed.
It is the percentage of No of clicks on advertisement and number of page views.
TR = Number of clicks / Number of exposures.
CTR% = Number of clicks * 100 / # of exposures
So in simple words, if you have an ad running and it’s seen by 100 people but got only 5 clicks, your CTR is 5%. Point to be noted here is that higher the percentage of CTR, the better advertisement you will get. So it’s advisable to place advertisements only at the places which are viewable and can be clicked easily.
Now, One of the most common questions is What is Good CTR or I’m getting enough click on my Adsense but my revenue is very low.
Let me cut out the myth about Adsense CTR here, getting too many clicks on Adsense ads will never guarantee good income, the key here is to target ads which give good PPC (Pay Per Click). On such ads, even few clicks will yield more money than 100 clicks.
I will be coming up with more topics on Google Adsense to make your AdSense experience better.
Welcome to Guide Tricks today i am going to discuss about Gmail account disable problem, few days back I faced in problem when my Gmail account got disabled and I understand the severity of the situation.If you getting error like “sorry, there seems to be a problem. the service you’re looking for is temporarily unavailable. we’re working hard to restore your access as soon as possible. please try again in a few hours. thanks for your patience”
This is a temporary Gmail glitch, and you will be able to access your account soon. But, if you are seeing warning message like below:
YOUR PROFILE IS DISABLED:DELETED
They can use the given below link to retrieve there account but do remember that it might happens that you have to enter the form more then one time. In my case I had to enter it 5 times but in the end I luckily retrieved my account.
So better bookmark this link in case your Gmail account got deleted or disabled
How many times, have you received Email from an unknown person. The email could be about anything like threatening, a TIP, suggestion and for personal stuff. Sometime it’s important to find the location of the Email sender to make a wild guess about who this anonymous Email sender is. In this tutorial, I’m sharing how you can trace sender IP address in Gmail with simple steps.
Sidekick by Hubspot could be a useful tool for you. You can read more about it by clicking the link below:
Follow the Steps:
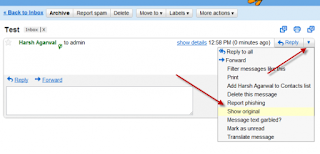
Open any Email in Gmail
Click on More Options and Click on “Show originals.”
Refer to Image for More details:
Now a new Window will pop up like this, and there see the highlighted area
One of the most important elements for any Blog, Websites or a Business website is tracking the stats. There are many ways and many online websites/services which offers stats tracking. But, out of all I have been using Google Analytics from day one of guidetricks and from the experience and amount of information which I get from GA is unbeatable. Specially, new GA also includes live visitor reporting, which was one feature we always missed in this free stats program from Google.
The internet has provided us with the opportunity to share our thoughts with millions of people around the world. This kind of exposure has motivated a lot of people to create blogs and other websites where they can share their ideas and talk about the topics they like with other people, through the internet. As the internet is able to connect people, regardless of where they live in the world, a lot of businesses have also made use of this opportunity for promoting themselves. They have created websites about the business that they have and what products or services, they are able to provide to people. A lot of websites sell clothes and other things to people. People who have blogs also make money through blogging and putting up advertisements from other companies or websites.
Those of you who have a website, know how difficult it is to properly run a website and make it rank higher. There are millions of websites present on the internet, and that is why there is a lot of competition. Site analytics tool helps in getting details information about your visitors like traffic source, reader demographic, browser used, bounce rate and many more which is very crucial for every blog and websites. Getting to know about the number of visitors on your website and which pages were viewed the most can be a lot of help when you want to improve the website that you have. So, how can you obtain a detailed statistic about the visitors who visit your website?
he answer to this question is simple. You can obtain a detailed statistic about the traffic your website gains through Google Analytics.
Google Analytics
If you are completely new to GA, Google analytics is a service offered by Google to get detailed insight on your site traffic. Details like how people found the website that you have, which pages they visited. This way, you can get an idea about how you can improve your website in order to get more traffic and make the visitor experience better. As many of you, who have a website, have advertisements on them, getting to know how you can attract more internet visitors can help you earn more money from your website.
There are a lot of things which you can get to know from GA. You can see from which various sources you got your visitors, meaning whether the visitors you got were from search engines, pay-per-click networks, website links in PDF documents, or through e-mail marketing. You can even see which advertisements are performing well and, which are not. You can even get to know the sales you have made through the website and know about other commerce-rated statistics. Though to configure advance analytic, you may need to set parameters and custom rules, which we will discus in coming days.
Getting started with Google analytics is easy and anyone can open a free account and install GA code to their website , and you will be able to receive and in-dept statistical report about the performance of your website.
How Google Analytics Work:
All of this talk about various website statistics must have made you curious to know about how Google Analytics can do all of this. Not to worry, as I’ll explain its working in the easiest way as possible.
As mentioned earlier, GA tracks how visitors interact with the website that you have. GA can tell you from where these visitors came from, what they did when visiting the website, and if they completed the conversion goals present on the site. All of this information is collected by Google Analytics through a first-party cookie and a JavaScript code. It also tracks e-commerce data and lets you know about the performance about your advertising campaigns.
The thing which I like about Google Analytics is that all the statistical data is presented in a very easy-to-read manner, and you even get to see visual reports, which make, understanding the data easier.
Features of Google analytics:
Analytics give detailed information regarding how your web pages are performing and how users are interacting with them. Google also added Social signals, which has become one of the biggest search engine metric in post panda SEO world.
Analysis Tool
The Analysis Tool present in GA is very useful. It enables you to get the data you need. It provides you with the statistical reports concerning the website you run. The intelligence of GA is such that it automatically lets you know about significant changes to the visitors your website has received. It even allows you to create powerful filters and segmentations of visits.
Content Analytics
This feature allows you to know about the top content present on your website. You will also get to know how many people visit the pages of your website, and how long they stay on your website or a certain page. You even get to know what visitors are searching for. You can also fix the problem of slow loading webpages. You even get to know about the best places to place your ads on the website.
Mobile Analytics
This feature allows you to measure mobile apps, websites and visits you receive from web-enabled mobile devices. This is important these days, as people have been moving to smartphone and smartphone browser contributes a lot into current visitors.
Conversion Suite
You get to know about how all your digital marketing channels work together in order to bring visitors to your website. You can keep track of the sales made, downloads you got or other things that are of importance for you. You can get to know why some visitors buy things from you and why others don’t and such a way you can make your website better.
Adsense and Analytic integration:
If you are using Adsense to monetize your Website, GA will give detailed information regarding how your pages and adsense is performing. (How to link)You can find out top performing and least performing pages and make adeqate changes to increase adsense earning. For Adsense Bloggers, I also suggest to read my Adsense guide for boosting your revenue.
Advertising Analytics
We all work as hard as we can in order to attract as many visitors as we can to the websites that we have. We also place ads on our websites in order to make money. However, it is very helpful if we get to know if the ads that we have placed are making money for us or not. This feature allows you to select better keywords and create effective landing pages. This feature also tells you how effective your ad campaigns are and how you can make them more profitable for yourself.
Real time visits:
Last year, GA also integrated real time visitor tracking feature in GA. This feature is enabled by default and if you are using any paid analytics tools for getting infromation regarding live visitors, Google analytics will be very useful to save your money.
Read: Google Analytics Premium and Real time analytics
There are just some of the features of GA and there are many more. Using Google analytics or any stats program is an essential for any Webmasters. If you are completely new to GA, here is a training video which will give you more details information regarding How to use Google analytics and how you can set up:
One of the most common myth related to GA is: People believe that Google uses analytics data to define your search ranking, but it’s not true. As Analytic gives statistical data related to web pages. You can use it to improve your ranking for example, you can find pages with maximum loading time, bounce rate, less avg. time on page and enhance them to make it better.
In short, if you have been using any other stats program apart from GA, I suggest you to give it a shot and see how this detailed stats will help your site to grow. All the reports give an in-depth analysis about the working of a website, and you can use the reports to make your website the best it can be. You can learn more about Google Analytics by taking their IQ lessons.
Do let us know which stats program are you using on your blog for tracking visitors? If you find this post informative for newbie and staters, don’t forget to share it on Google plus and Facebook.
Make Money With Yllix.com. Yllix.com is one of the best advertising media site like as Google AdSense. Yllix.com is familiar by the name of YLLIX Media. This site is very new, but looks very professional, anyone can use this site for money making online. Use Yllix.com site and boost up your online earning very quickly. Actually, this site is the best alternative to Google Adsense. Yllix.com inaugurate their advertising business in October 2012. You can use this site as a publisher and also Advertiser.
Yllix Media Review:
Yllix Media is another advertising option as publisher or advertiser like as Google Adsense. You can use this advertising media site with all kind of standard Advertising setups like as Banner Ad, PopUp Ad, Layer Ad, Redirect Ad, Prepop Ad, Full page Ad in size like as 300x250, 728x90, 468x60, 120x600, 160x600. The great news for Publisher and advertiser is yllix.com or Yllix Media site allows any kind of website, Blog, forum or any other.
Yllix media publisher review. Yllix.com publisher area is very popular for a website, Blog owner. Any website or blog owner can use this site totally free and make money very simply to publishing their ads. Yllix media is a legit publisher network in this world, Personally, I use this site and make some handsome cash in several time. Yllix Media functions are very impressive for publishers who approved to show Yllix Premium advertising which has over $0.10 CPM price for all kind of small or big publishers with free hosted blog or Web sites.
How much Pay Yllix media per visitor:
Yllix media pay per visitor is not fixed, It's totally fluctuated and depends on visitors country. If you have quality traffic like as USA or European country based traffic then you can better earning.
Yllix.com is Legit or Scam:
Yllix.com is a legit site, no doubt about this. I personally use this site, so I confirm you 100% this is a trustworthy and reliable site. Anyone can use this site with 100% confidence.
Yllix.com support very popular and useful payment system like as Paypal and Payza system, I personally use Payza for withdrawing cash. You can cash out this when your income reaches in $1 USD by Paypal or Payza.
Yllix.com Payment Proof:
Now I give Yllix Media payment proof screenshot that can be helpful for you in this site trustworthy.
Note: I am really happy if anyone gets any benefit in this post and also I request if you get any advantage in this post then share this post in your facebook, Whatsapp, Twitter or Google+ account.